Not sure how custom Lego instructions work? Don't worry, we've got you covered.
Where to purchase pieces

Lego.com has a PAB (Pick-A-Brick) feature on their website where you can purchase certain pieces in certain colors. Lego does not offer all the pieces and all the colors that have been available in the past. Here is the link to Lego’s pick a brick
store:
http://shop.lego.com/pab
It might be helpful to start assembling pieces using the Lego PAB because of the large selection, and then move to the aftermarket to finish assembling the pieces.
Bricklink.com
is a website where you can choose from thousands of sellers, and you can find just about anything that Lego has ever released. Many of the pieces found in our instructions cannot be bought from lego.com but can be found on Bricklink in plentiful
quantities. Here is a link to a helpful user guide to get you started:
Bricklink New User Tutorial. Shop around a little bit to get a good idea of how much different bricks in different colors are going to cost you.
Colors
The names of colors will vary between different sources. The colors that are listed on our parts list correspond to the names on Bricklink.com which can be seen here: Bricklink Color Guide Here is a comparison color chart that shows the difference between the official Lego color names/numbers and the aftermarket color names/numbers: Peeron Color Guide We use the aftermarket names in our parts lists because we feel you’re much more likely to be able to assemble all the parts using aftermarket sources like bricklink.com. You might be looking for parts at Lego’s PAB and not see any colors marked as “Light Bluish Gray”. That’s because Lego refers to this color as “Medium Stone”. Consult the Peeron Color Guide to learn the differences.
Part Numbers
The part numbers listed in the parts list correspond to the numbers on bricklink.com , and in many cases also correspond to Lego’s Design ID. Many of the pieces that Lego makes have a 4-5 digit number on them and that is generally the number given to the piece. Lego PAB uses an element ID and a design ID. The Design ID usually corresponds to the part number we use in our parts list. The Element ID lines up with the numbers you see next to parts in the parts list in the back of official Lego instruction booklets. If you want to use lego.com to buy the pieces from the parts list you should try typing in the number of the piece in the box that says “Design ID”. Or search for it in their categories. If you can’t find it, they might not be currently offering that piece; check Bricklink. In some cases, the numbers we give might have letters in it; 2412b for example. You might want to start by searching for ‘2412’. 2412b denotes a different version of 2412 than the original version. In most cases, these parts are completely interchangeable, and some Bricklink sellers won’t know or note the difference.
Tips
- Before rushing out to buy all the pieces necessary, look over the instructions to see where certain pieces go. Certain pieces are hidden in the model and it won’t matter what color you choose. Other times you might want to change the color of something on the model. For instance: you might want a red stripe to go around the train station instead of the dark green one that is in the instructions.
- Change the color of the model to suit your needs. You like the glass delivery truck but you want yours to be red, instead of brown. Look at the parts list and exchange brown bricks for red.
- Sometimes using a color that is close will do the trick like using light grey instead of light bluish grey.
- You don’t necessarily have to use the exact same pieces we do. Sometimes the number of studs is more important than the particular bricks that are used to achieve that stud length. For example, we may show using a 1x8 brick in a particular situation. If it isn’t structurally important to use a 1x8 brick and you need to conserve 1x8 bricks, or you’re out of 1x8 bricks, see if you can substitute 2 1x4 bricks, or a 1x6 and a 1x2.
- When making our models we strive to make sure that all pieces are readily available for purchase on bricklink.com. Brick City Depot cannot guarantee that they will always be available. If they aren’t available, look for close substitutes that will achieve the same effect.
- Lastly, we are human! Chances are you might find something in our instructions or parts list that doesn’t make sense or is flat out wrong. Please don’t get frustrated and give up! If you are having a hard time understanding some part of the instructions or parts list, you might not be the only one. We want to take the time to make sure that all of what we sell is as clear as we can make it. Please feel free to contact us at sales@brickcitydepot.com for clarification, or to report errors. If we agree with you that something was confusing, we will fix it for future users of the instructions, and get you an updated copy of the instructions or parts list, if you wish.
How to use the parts lists
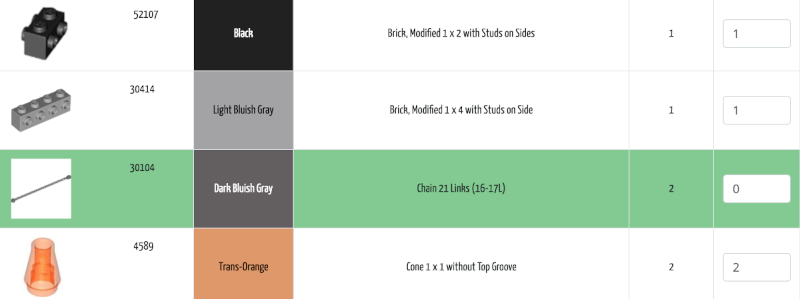
With each set of instructions you buy from us, you get a checklist-style parts list that you can use to assemble an XML parts list that BrickLink understands. You can use this XML text to easily upload your wanted list to Bricklink. The checklist-style parts lists are accessible through the My Account link, where you can review instructions you've purchased. These parts lists have images of each of the pieces you will need, along with descriptions, part numbers, quantities, color names and links to where you can find the parts on Bricklink. A very useful feature for determining what pieces you already have, and what you need, is the text fields in the right-most column of the parts list table. Use these text fields to increment/decrement the quantities of the pieces you need. When you have collected all the pieces you need for a given part/color combination, set the quantity needed to 0. When you leave the quantity needed field, the row for the given part/color combination will turn green to reflect that you have gathered all the pieces you need for that particular part/color combination.

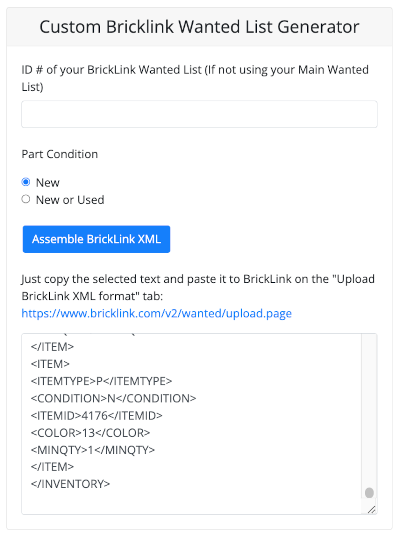
After you have updated quantities for all the parts you already have, you might want to upload the remaining parts to your Bricklink wanted list. Using the form at the bottom of the parts list, this is super easy. You are given 2 options when assembling your custom wanted list. If you want to upload the wanted list to a Bricklink wanted list other than your main wanted list, use the text field labeled 'ID # of your Wanted List' to enter the numeric ID of your wanted list. Leaving this field blank will mean the generated parts list will be uploaded to your Main wanted list. You can also choose which condition you want your parts to be in. The default is new, but you can select 'New or Used' instead. Selecting 'New' means each item in your wanted list will specify that you want the item in new condition only. Selecting 'New or Used' will not specify a condition, which can make it easier to find some parts. There are a lot of reputable Bricklink sellers who sell decent used parts, although there are a few bad seeds that will sell used legos that look like they've been chewed on. We prefer new, but will buy used if necessary to complete a model. When you're ready, submit the form by clicking the 'Assemble Bricklink XML' button. This will look at all the part/color combinations you updated and determine what you still need. It will then assemble custom XML for you to upload to Bricklink and display it in a textbox below the button.

The text is already selected, just copy the text (Ctrl-C for Windows, Cmd-C for Mac). Now, go to this page on Bricklink: https://www.bricklink.com/v2/wanted/upload.page
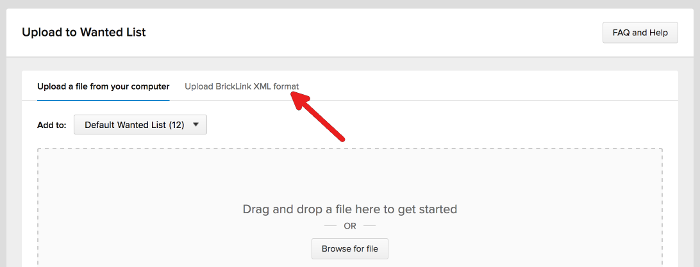
First, you will see a page with 2 options for uploading wanted lists. Let's select "Upload BrickLink XML format"

Now, let's paste that XML into the text field you see.

After you paste the text into that field, submit the form and you will go to a screen where you will be given a chance to verify before you add the items to your wanted list. Verify the items with the submit button at the bottom of the screen. Now
that you've added the items to your wanted list, it's time to go shopping for the parts! On your 'Wanted' page, you'll see a button labeled 'Buy All'. Click that button and get started!.
